


A few weeks back Dan Palmer completed a VEG (Very Edible Gardens) preliminary permaculture design consultation in Woodend, Victoria, Australia. Here he shares the process.
The VEG Design Process

The diagram above summarises VEG’s approach to permaculture design, and unless you are particularly interested in such matters, just notice the four main phases — observation (of people and place), design (concept, then detailed), implementation, and management. Here we’ll show how we went through the first two phases with a little bit of the third and forth thrown in too (it just so happened that VEG’s Will and Josh constructed a VEG compost bay system as the design unfolded, and that they are now in use).
1a. People Analysis and Assessment
So, step one, after a quick first impression (and in this case downloading an aerial photo on the train on the way there), was to share a cup of tea with our lovely customers, Elvira and Jan. Again, I won’t bore you with the details, but the most important thing this resulted in was first a stated purpose for the design in terms of the flavour of the space the design was intended to help realise, and second, a wish list of desired items.
With this stated purpose I started by asking for some words Elvira and Jan would like to be true of their garden. They said "colourful, green, relaxing, light, kid-friendly & welcoming, eat from garden most days, private, free of ivy, full of life, multiple spaces."
As it was only a preliminary consult and we had to push on, I quickly worked these into the sentence: "Our garden is a colourful, green, relaxing and private space that is full of life, fruit, and veggies. With multiple spaces to explore, it is welcoming, safe and friendly to kids, and free of ivy." I read this out to Elvira and Jan and asked them if it felt good and right and true to what they both wanted — it did, based as it was on their own words. In fact they got quite excited to hear their future garden described! This sentence gave the whole consult a solid grounding — once you have a statement like this, you can assess all of the subsequent details to make sure they fit in with and contribute to it.
The other important bit was the wish list, which I grouped into the following areas:
- berry patch
- veggie patch (salad greens and kitchen herbs as well as main crop beds)
- fruit trees (were keen on both deciduous and evergreen)
- natives
- utility area (greenhouse, propagation, outdoor sink, compost bays)
- possible future tank
- lawn
- entertaining areas
1b. Site Analysis and Assessment
Here is the base map of the site, with the legal property boundaries overlaid on an aerial photo (accessed from nearmap.com which we subscribe to — which is generally more recent and higher resolution than Google):

Next here is a rough sketched summary of the site analysis, focusing on relevant forms of incoming energy (wind, views, sun) and the microclimates or differences across the site, diagrammed as overlapping bubbles, blobs or clouds with rudimentary labels:

2a. Concept Design
Having done the people and site analysis and assessment minimum justice, we moved into the design phase where we start by locating, shaping and sizing the required areas (as opposed to the individual bits and pieces). The concept design looks much like the microclimate analysis — with overlapping blobs. To paraphrase Christopher Alexander, here we are massaging crinkles into the site, though what we are largely doing is relabelling crinkles that the site actually massaged into us! (during the site analysis). Here is my concept design for this site:

2b. Detailed Design
Once the customers have been talked, and perhaps walked, through the concept design, and their feedback incorporated, we then detail the design, moving from the placement of overlapping areas to the placement of distinct things — taking into account the site and its microclimates, access and circulation patterns, and making as many positive connections as possible. Here is the detailed design we knocked up next (whilst still on site — design rendering is much easier when you’re still there!):
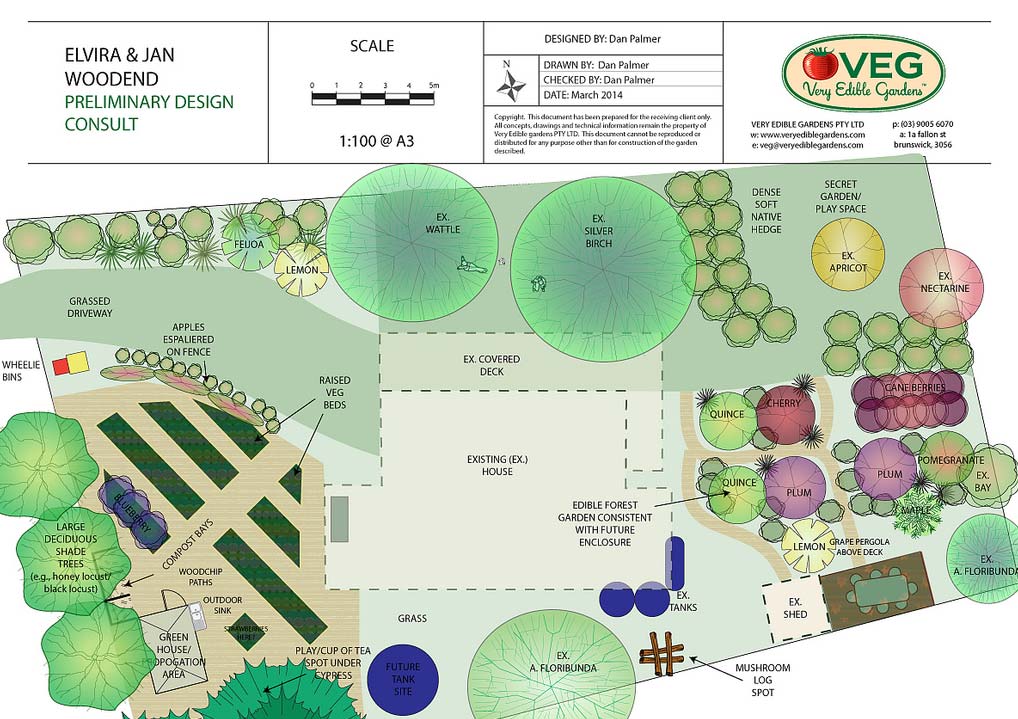
Click for larger view
Note that while the detailed design might look more impressive, the germ of the design, the underlying pattern, is in the concept design. The rest is details, variations on an underlying theme. I also like to record a short video clip talking through the design before I leave, often a great idea and much easier for many people to get a flavour for the thinking behind the design and what the garden will look like post implementation:
3. Implementation
So, the compost bays were implemented in conjunction with the design, and here are some photos of that process:


 |
 |
Elvira and Jan also have a working bee in a week or so and look forward to making some major progress on the rest of the design with 20 or so helpers on site.
4. Management
It was great to hear from Elvira a few days back, that the first compost bay has been filled and is steaming away with the microbes doing their thing.
Anyway — that’s one example of the VEG design process which in this case unfolded over about 4 hours on site and 1 hour off site, and which included a 32-page report talking through the details of the design with plant suggestions and whatnot.


That compost bin looks a bit serious at about 3000 litres, all concreted in. The one my family of 4 uses is about 130 litres and we never fill it. It would be nice to see more natural permaculture gardens too, instead of all these tokenistic pine boxes – they remind me of veggie coffins and miss several key permaculture design principles. This is kind of like fast food permaculture design really.
Hey Tania and thanks for prompting a recap of the main point of the article, though I suspect you may have looked at the more detailed design diagram and photos without reading the text? All good, I often do that too, though I might be so game to then comment as you are!
Anyways, the main point of the article was that in our experience the core part of the design lies in the relative placement and proportioning of the AREAS. The details of the size and shape of individual ELEMENTS then evolves out of a conversation with the client, and within reason (which includes feedback from the designer) what they want is what they want, and it’s really not up to you to judge and criticise if their functional requirements and desired aesthetic doesn’t happen to harmonise with yours. They are them, after all, and you are you.
In this case Jan and Elvira chose a three-bay compost system ahead of the design process after trying smaller systems and realising they needed something more serious. You may not have used one, but they have one bay full and cooking nicely already, full of pruning and cuttings from their large garden, and there is a reason so many serious gardeners and community gardens use this design – it works!
Again the core of the design was about locating the area the compost system, whatever form it took, would be located. Incidentally, there is no pine involved here – the compost bays are made from locally and ethically sourced cypress macrocarpa, and the low raised beds were already onsite and in very productive use and I think recycled eucalyptus railway sleepers that the concept design process revealed to be in a great spot, but the detailed design suggested would be better oriented closer to across contour.
This again was a case of the clients knowing what was already working well for them – the core of the design process was finding (and in this case confirming) the best general area for the veggies, and the details are just that, details. I hope that makes sense, that the design core I see as relevant is about tuning into the people and the site, which together suggest a design that bring both together in a mutually beneficial productive union.
That said, it would be useful for my own understanding and possibly the understanding of other readers if you would be happy to share the “key permaculture design principles” you believe rectangular raised garden beds miss. I can only hope you’re not going to say they should all be mandala and keyhole beds with some herb spirals for good measure – which would be a much better example of what you call “fast food permaculture”! That said, I should not hide from the fact that this was what we call a preliminary design consultancy, meaning the clients choose to have us do whatever justice we can to the process in five hours, which is a little quicker than the ideal of observing for a year, designing for six months or so! That said with a little experience under our belt we find that we can leave folk with something of value that helps them on their journey and makes it likely that their compost bay ends up in a good spot!
In this case I am much enjoying Elvira’s emails and photos updating me on their progress in implementing the design – they are making some wonderful progress with help from friends, most recently with the site prep and planting of two little guilds with fruit trees at their centre.
A final point I should have mentioned in the article is that anyone familiar with Dave Jacke’s work will immediately pick up the debt we owe him and the influence his understandings of the design process have had on our own. Thanks Dave and if you’re keen to see what we mean check out Edible Forest Gardens Volume Two, Chapters Three & Four – very highly recommended!
My Best,
Dan Palmer
For any readers out there, I just reread my preceding comment and yikes – I must apologise for the number of times I said “core of the design” and “That said.” !!!!
Can you explain how each step is informed by permaculture ethics and design principles to create regenerative human-supporting ecosystems applies to the raised beds? I’m not opposed to the use of such intensive production systems but I am curious as to how you satisfied the quoted statement.
Dan and Adam were very generous in sharing their design process with us. I, for one, appreciate it a great deal. Clearly it was a truncated design on an established site with some infrastructure and mature trees already in place. Raised garden beds are for intensive and easily accessible production. Zone 1 stuff. I didn’t know that was a questionable thing. Besides, maybe this design is just the jumpstart the homeowners need to observe and interact their way towards greater levels of function stacking, diversity, and integration so they develop the permaculture design of THEIR dreams over time. Remember succession?
While I’m sure that Dan and Adam are quite capable of standing up for themselves and their work, perhaps they’re just too polite. So… There is a difference between critique and criticism. Designers should be used to critique, or they shouldn’t be designing. Criticism only serves to make the one leveling the criticism feel superior somehow.
Perhaps the critics could submit their designs and some insight into their process. I really love to see other peoples work.
Thanks Dan, lots of good stuff for us “budding” designers. The detailed design looks very impressive. . . .what program do you use?
Thanks for your comments Brent & Anthony – I used adobe illustrator to render the design.